Data management
Data entry
Users are only able to enter data into Cinchy based on their access. Users can also copy and paste data from external sources.
Insert/Delete data rows
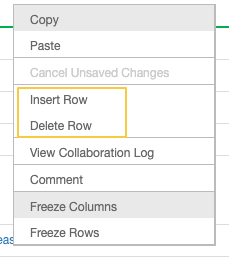
Users are only able to insert or delete rows based on their access. If you have the ability to insert and/or delete a row of data it will be visible when right-clicking on a row of data (Image 1).

Import data
Importing data allows you to add new rows of data into a table. If you want to perform a sync, refer to the CLI. Importing data acts as a smart copy-and-paste of new data into an existing table.
Importing the first row of your CSV as a header row will match the headers to the column names within your table. Columns that can't be matched are ignored, as well as any columns you don't have edit permissions for.
Users can import data from a CSV file to an existing table in Cinchy. Importing data into a Cinchy table only adds records to the table. This data import type doesn't update or append existing records.
To import data into a table, complete the following:
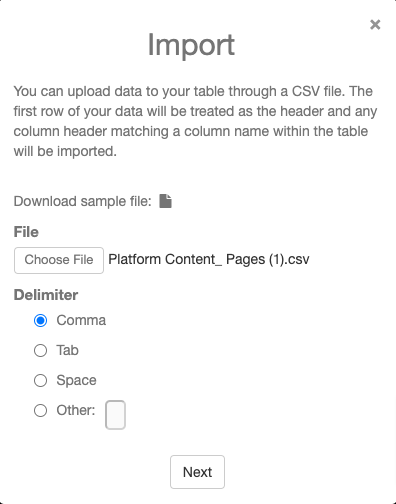
- From within the table, click the Import button on the top toolbar of the table (Image 2).

-
Click Choose File to locate and import your file.
-
Validate the imported columns and click next (Image 3).

-
Click the Import button
-
Click the OK button on the Import confirmation window
Import errors
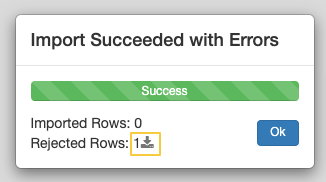
If there are import errors, click the download button next to Rejected Rows on the Import Succeeded with Errors window (Image 4).

You will get a file back with all the rejected rows, as well as the 2 columns added called ‘Cinchy Import Errors' and 'Cinchy Import Original Row Number’.
Cinchy original row number
This provides a reference to the row number in the original file you imported in case you need to check it.
You can simply fix any errors in your error log followed by importing the error log since successful rows are omitted.
Export data
You can export your data from a table view in CSV or TSV format. This export starts at the first record. Cinchy doesn't currently support pagination, so the maximum export is 250,000 records. To export a table of more than 250,000 records, you can use CLI to export your entire table at once.
When data is exported out of the network, it's now just a copy and no longer connected to Cinchy.
To export data from a table, complete the following:
- From within the table, click the Export button in the table toolbar
- Select the Export file type (CSV or TSV) (Image 5).
- Open your file in Excel, or any other CSV software, to view.

5. Approve/Reject Data
Cinchy can have data change approvals for when data is added or removed from a table view. A change approval process can be put into place for the addition or removal of specific data. If you have been identified as an "Approval" of data you will have the ability to:
- Approve a cell of data
- Approve a row of data
- Reject a row of data
To approve or reject a cell/row of data, complete the following:
- Right-click on the desired row/cell
- Select Approve row/cell or Reject row/cell
Collaboration log
The Collaboration log is accessible from every table within Cinchy (including metadata). It shows the version history of ALL changes that have been made to an individual row of data.
To access the Cinchy Collaboration Log:
- Open the desired table
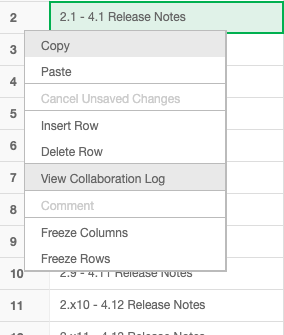
- Locate the desired row > Right Click > View Collaboration Log (Image 6).

Once the Collaboration Log is open you have the ability to view ALL changes with a version history for the row selected within the table.
Users have the ability to revert to a prior version of the record. To do so, click the Revert button for the desired version (Image 7).

A record can have a Revert button. This indicates that version record is identical to the current version of the record in the table. Hovering over the Revert button displays a tool-tip.
Data erasure and compression policies
By default, Cinchy doesn't delete any data or metadata from within the Data Fabric.
Click here for more information on Data Erasure & Compression Policies in Cinchy
Audit for data synchronization
Audit Logging of data loaded into Cinchy via Data Synchronization such as batch or real-time using the Cinchy CLI, or through data changes by any Saved Queries exposed as APIs to external clients, is recorded the same way as if a user entered the data into Cinchy. All data synced into Cinchy will have corresponding line items in the Collaboration Log similarly to how it's handled when data is entered / modified in Cinchy by a User.
Collaboration log performance considerations
The Collaboration Log data is also stored within Cinchy as data, allowing the logs to be available for use through a query or for any downstream consumers. The logs have no separate performance considerations needed, as it relies on the Cinchy platform’s performance measures.
Recycle bin
All data records that have been deleted are put into Cinchy’s Recycle Bin. Data that resides in the Recycle Bin can be restored if required.
To restore data from the recycle bin:
- From the left-hand navigation, click Recycle Bin (Image 8)
-
Locate the row for restoring
-
Right-click and select Restore Row.
The restored row will now be visible in your table.
If Change Approvals are turned on, that row will need to be approved.