Cinchy Event Broker/CDC to REST API example
Overview
This page provides an example walkthrough of the following scenario:
- Using the Cinchy Event Broker/CDC on a Cinchy Table to sync data updates into a REST API destination.
Example Use Case: Syncing employee information from a Cinchy Table to a REST API, in real time.
This example uses the following features in building the sync:
- RunQuery -- which uses a query as the trigger for the Cinchy Event Broker/CDC.
- Webhooks -- which will be used to create a REST API that points to a Cinchy Table for our purposes.
Building the Sync
The example is broken down into the following stages:
- Define the source
- Create the source table
- Turn on the Cinchy Event Broker/CDC
- Create the query to be used as the trigger
- Define the destination
- Create the destination table
- Create the REST API (via Webhook)
- Configure the Sync
Define the Source
In this example, our source is a Cinchy table/the Cinchy Event Broker.
Create the Source Table
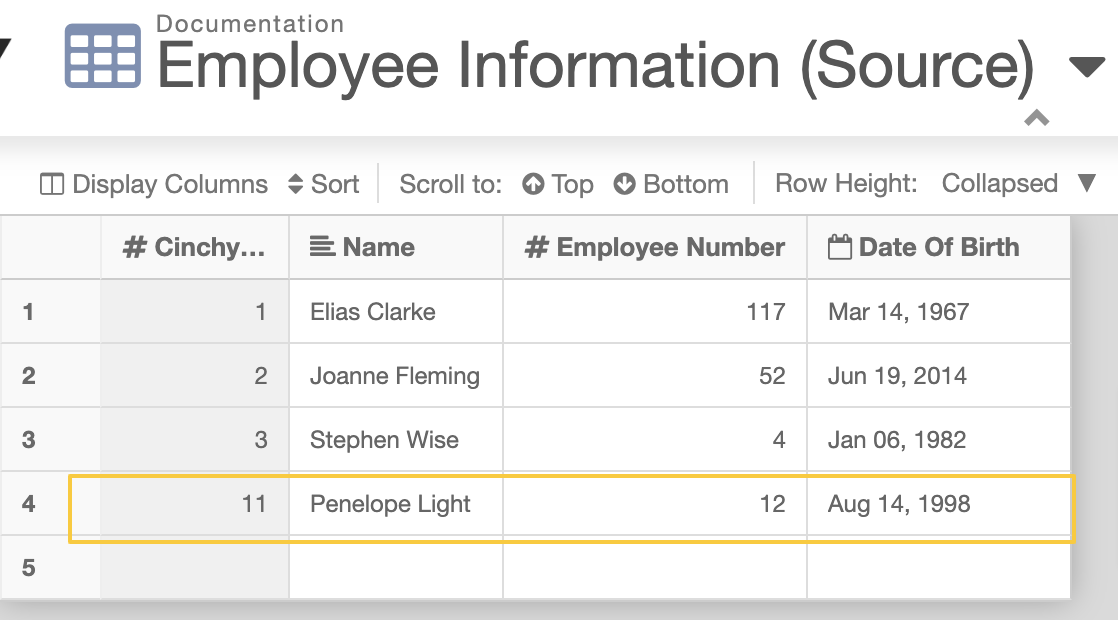
We have created a [Employee Information (Source)] table, with the following columns:
| Column Name | Definition | Data Type | Example |
|---|---|---|---|
| Cinchy ID | System column included by default. This column will be used as a parameter for our RunQuery function. | Number | 1 |
| Name | The name of the employee. | Text | Elias Clarke |
| Employee Number | The number associated with the employee. | Number | 117 |
| Date ofBirth | The employee's date of birth. | Date | Mar 14, 1967 |
Turn on Change Notifications
To ensure that the Cinchy Event Broker/CDC is actively listening to the table, you must publish the Data Change Notifications.
- Navigate to Design Table > Change Notifications.
- Check the Publish Data Change Notifications box.
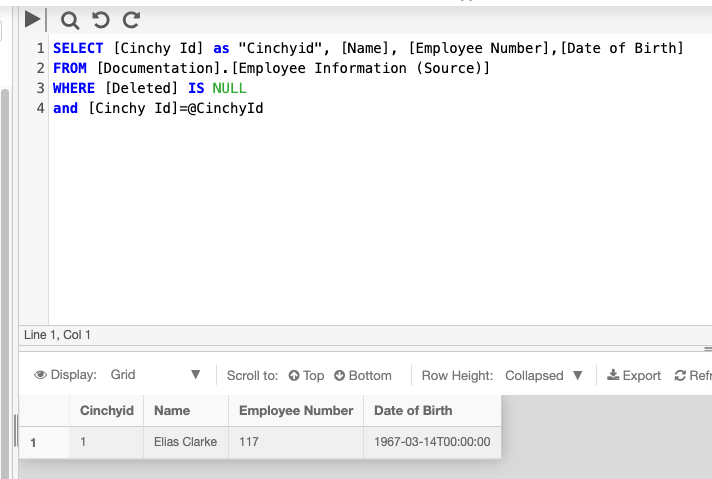
Create the Trigger Query
Instead of having the Cinchy Event Broker/CDC listen to the table, we want to utilize the RunQuery function to have it listen to a query instead.
In this step, we create the query.
The [Employee Information Sync] query uses Cinchy Id as a parameter, and returns the associated [Name], [Employee Number], and [Data of Birth].
SELECT [Cinchy Id] as "Cinchyid", [Name], [Employee Number],[Date of Birth]
FROM [Documentation].[Employee Information (Source)]
WHERE [Deleted] IS NULL
and [Cinchy Id]=@CinchyId
Define the Destination
In this example, our destination is a REST API.
For our purposes, we are creating a REST API via a Cinchy Table webhook.
Create the Destination Table
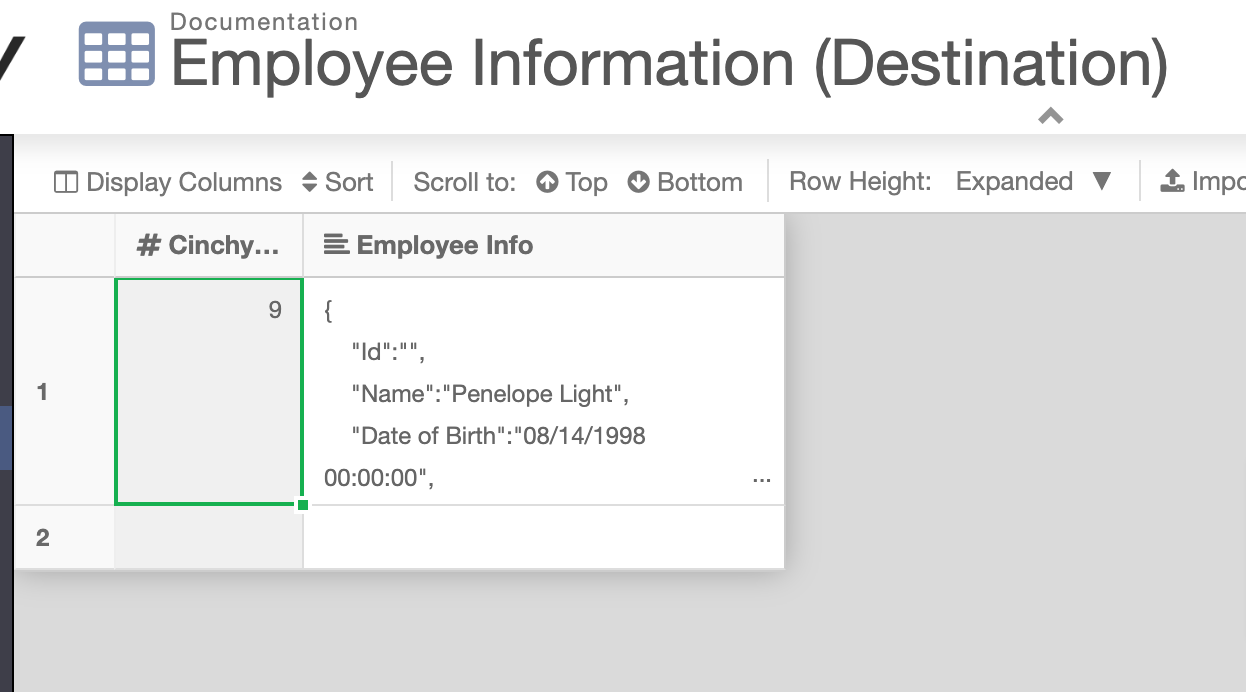
We have created an [Employee Information (Destination)] table, with the following column:
| Column Name | Definition | Data Type |
|---|---|---|
| Employee Info | This column will contain the message posted by the REST API. |
Create the REST API
For this example, we are creating an internal REST API that updates our Cinchy destination table. This can be achieved using a Webhook.
Follow the instructions outlined here to create your Webhook, using the [Employee Information (Destination)] table as the API target.
The following example query is used in our Webhook:
Insert into [Documentation].[Employee Information (Destination)] ([Employee Info]) VALUES (@Name);
The following shows what the example Webhook would look like: cinchy.net/API/callback?key=CDCtoRest
Configure the Sync
Now that you have all of the pieces created, you can configure the data sync itself.
- Navigate to the Connections Experience.
- In the Source tab, input the following:
| Section | Definition | Example |
|---|---|---|
| Source | The name of your Source type. | Cinchy Event Broker |
| Table | Tha table that the Event Broker is listening to. | Employee Information (Source) |
| RunQuery - Query | The name of the query you want to use to trigger the Event Broker. | Employee Information Sync |
| Query Parameters | The parameters associated with the above query. | "@CinchyId":"Cinchy Id" |
| Schema | Define the columns you want to use in your sync. | Cinchy Id Name Employee Number Date of Birth |
- In the Destination tab, input the following:
| Section | Definition | Example |
|---|---|---|
| Destination | The name of your Destination type. | REST API |
| Insert Specification - Request - HTTP Method | The type of HTTP method to use. | POST |
| Insert Specification - Request - Endpoint URL | The URL created via Webhook. | cinchy.net/API/callback?key=CDCtoRest |
| Request Header - Content Type - Name | Content-Type | |
| Request Header - Content Type - Header Value | text/plain | |
| Body - Content | The content that will be posted. In this example we are requesting the Cinchy Id, Name, Date of Birth, and Employee Number columns. | "Id":"@COLUMN('Cinchy Id')", "Name":"@COLUMN('Name')", "Date of Birth":"@COLUMN('Date of Birth')", "Employee Number":"@COLUMN('Employee Number')" |
- In the Sync Actions tab, select
Delta. - Save the sync to enable the listener.
We can test the functionality of the sync by adding a new row to the [Employee Information (Source)] table and checking for the matching payload in the [Employee Information (Destination)] table.