Configure ADFS
Before you begin
Before starting with the ADFS configuration, make sure to have following information:
| Information Required | Description | Reference |
|---|---|---|
| Cinchy SSO URL | The URL of your Cinchy SSO instance | {your.cinchysso.url} |
| Cinchy URL | The URL of your main Cinchy instance | {your.cinchy.url} |
| Cinchy SSO Installation Path | Directory where CinchySSO files are located | {Path/to/CinchySSO} |
| ADFS Server | The URL of your ADFS server | {your.ADFS.server} |
Having these details readily available will streamline the ADFS configuration process.
Configuration steps in ADFS
-
Navigate to AD FS Management on your ADFS server.
-
Right-click on Relying Party Trusts and choose Add Relying Party Trust to open the Add Relying Party Trust Wizard.
-
In the wizard, select Claims Aware > Start > Select Data Source.
-
Select Enter Data About the Relying Part Manually > Next.
-
Fill in a Display Name under Specify Display Name.
-
Skip certificate configuration in Configure Certificates.
-
In Configure URL, select Enable support for the SAML 2.0 SSO Web SSO protocol.
-
Input your login URL as follows:
https://{your.cinchysso.url}/Saml2/Acs -
Under Configure Identifiers, add an Identifier and press Next to complete the setup.
Set up claim issuance policy
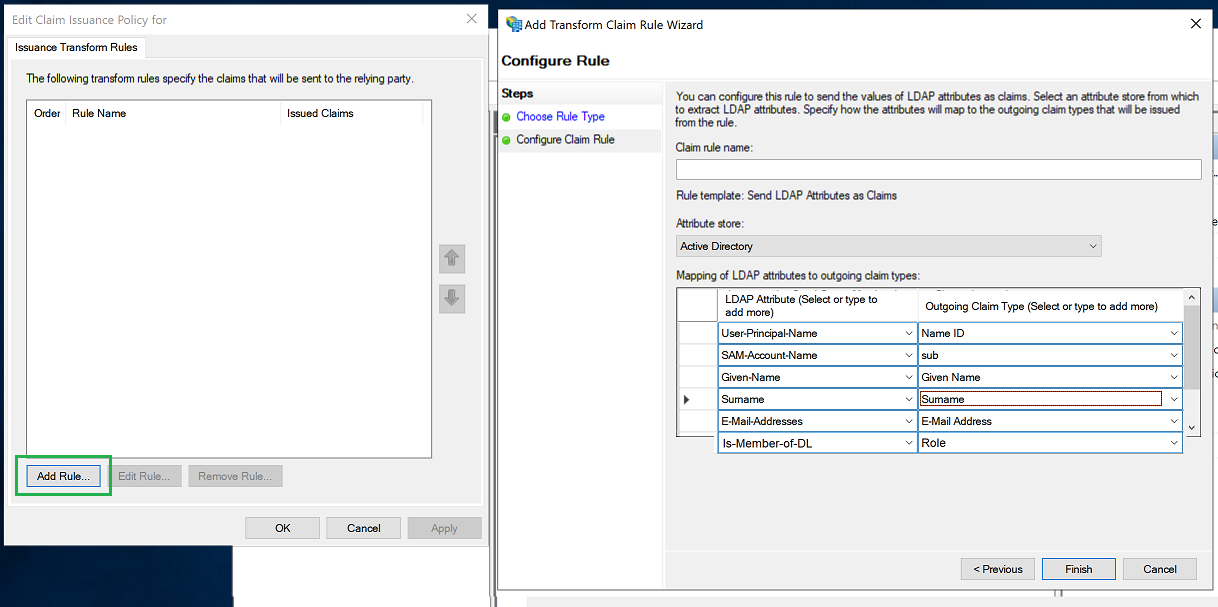
- Right-click on the newly created Relying Party Trust (located by its Display Name) and select Edit Claim Issuance Policy.
- Select Add Rule > Claim Rule > Send LDAP Attributes as Claims.
- Input a Claim Rule Name.
- In the Attribute Store, select Active Directory. Map the LDAP attributes to the corresponding outgoing claim types as shown in the table below:
| LDAP Attribute | Outgoing Claim Type | Comments |
|---|---|---|
| User-Principal-Name | Name ID | |
| SAM-Account-Name | sub | Type sub manually to avoid auto complete |
| Given-Name | Given Name | Required for Auto User Creation |
| Surname | Surname | Required for Auto User Creation |
| E-Mail-Address | E-Mail Address | Required for Auto User Creation |
| Is-Member-Of-DL | Role | Required for Auto User Creation |
-
Select Finish.
-
Select Edit Rule > View Rule Language. Copy the Claim URLs for later use in configuring your Cinchy
appsettings.json. It should look like the following:c:[Type == "http://schemas.microsoft.com/ws/2008/06/identity/claims/windowsaccountname", Issuer == "AD AUTHORITY"]
=> issue(store = "Active Directory",
types = ("http://schemas.xmlsoap.org/ws/2005/05/identity/claims/nameidentifier",
"sub",
"http://schemas.xmlsoap.org/ws/2005/05/identity/claims/givenname",
"http://schemas.xmlsoap.org/ws/2005/05/identity/claims/surname",
"http://schemas.xmlsoap.org/ws/2005/05/identity/claims/emailaddress",
"http://schemas.microsoft.com/ws/2008/06/identity/claims/role"),
query = ";userPrincipalName,sAMAccountName,givenName,sn,mail,memberOf;{0}",
param = c.Value); -
Press OK to confirm and save.
-
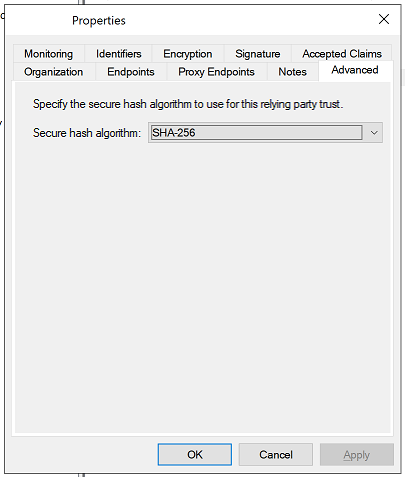
Right-click on Relying Party Trust > Properties. Move to the Advanced tab and select SHA-256 as the secure hash algorithm.
Configuration for Cinchy
Note: Please ensure that the configurations below are case-sensitive and align exactly with those in your SAML IdP setup.
Initial setup
- Retrieve and save the Federation Metadata XML file from the following location:
https://{your.ADFS.server}/FederationMetadata/2007-06/FederationMetadata.xml. - If needed, use IIS Manager to establish an HTTPS connection for the Cinchy website.
- Also establish an HTTPS connection for the SSO site. Make sure the port number aligns with the one specified in the login URL.
Configuration for appsettings.json
App settings section
| Attribute | Value or Description |
|---|---|
| CinchyLoginRedirectUri | URL of the user login redirecthttps://{your.cinchysso.url}/Account/LoginRedirect |
| CinchyPostLogoutRedirectUri | URL of the user post-logout redirecthttps://{your.cinchy.url} |
| CertificatePath | Path to Cinchy SSO certificate{Path/to/CinchySSO}\\cinchyidentitysrv.pfx |
| SAMLClientEntityId | Relying Party Identifier from earlier-configured Relying Party Trust |
| SAMLIDPEntityId | Entity ID for SAML IdP, found in FederationMetadata.xmlhttp://{your.AD.server}/adfs/services/trust |
| SAMLMetadataXmlPath | Location of saved FederationMetadata.xml from Initial setup |
| SAMLSSOServiceURL | URL path in Domain Controller's in-service endpointshttps://{your.AD.server}/Saml2/Acs |
| AcsURLModule | /Saml2 |
| MaxRequestHeadersTotalSize | Maximum header size in bytes; adjustable if default is insufficient |
| MaxRequestBufferSize | Should be equal to or larger than MaxRequestHeadersTotalSize |
| MaxRequestBodySize | Maximum request body size in bytes (use -1 for default; usually no need to change) |
External identity claim section
You will need to refer to the Rule Language URLs you copied from the ADFS Configuration. Replace the placeholders below with your own URLs:
{
  "AppSettings": {
    // Replace placeholders below with URLS
  },
  "ExternalIdentityClaimSection": {
    "FirstName": {
      "ExternalClaimName": "http://schemas.xmlsoap.org/ws/2005/05/identity/claims/givenname"
    },
    "LastName": {
      "ExternalClaimName": "http://schemas.xmlsoap.org/ws/2005/05/identity/claims/surname"
    },
    "Email": {
      "ExternalClaimName": "http://schemas.xmlsoap.org/ws/2005/05/identity/claims/emailaddress"
    },
    "MemberOf": {
      "ExternalClaimName": "http://schemas.microsoft.com/ws/2008/06/identity/claims/role"
    }
  }
}
Edit web.config
Insert the following lines within the <appSettings> section of your web.config file. Make sure to replace the {your.cinchy.url} and {your.cinchysso.url} with your Cinchy and Cinchy SSO values.
<appSettings>
  <!-- Replace placeholders below with URLS -->
  <add key="UseHttps" value="true" />
  <add key="StsAuthorityUri" value="https://{your.cinchy.url}" />
  <add key="StsRedirectUri" value="https://{your.cinchysso.url}/Account/LoginRedirect" />
  <!--  -->
</appSettings>