Deploy IIS
Overview
Cinchy can be deployed either via Kubernetes or via Windows IIS. This page details the configuration and deployment instructions for the Cinchy Platform, including SSO, on IIS.
Note that the following components are deployed separately from the Core Platform. To install any of the following capabilities, navigate to their respective documentation pages:
Prerequisites
Minimum system requirements
The following minimum system specs are required to deploy the Core Platform:
- SQL Server 2017+
- Note: SQL Server Express will not work for this deployment.
- SQL Server Management Studio (SSMS)
- IIS 7.5+
- ASP.NET Core 8.0 Runtime (v8.0.x) Windows Hosting Bundle
- Cinchy v5.13+ uses .NET 8.
- v5.4 - v5.12 use .NET 6.0.
- v4.18.0 - v5.3 use .NET Core 3.1.
Minimum hardware requirements
The following minimum hardware specs are required to deploy the Core Platform:
- 2 x 2 Ghz Processor
- 8-16GB Ram
Minimum database server hardware recommendations
The following minimum database server hardware specs are required to deploy the Core Platform:
- 4 × 2 GHz Processor
- 24-32 GB RAM
- Hard disk storage dependent upon use case. Cinchy maintains historical versions of data and performs soft deletes which will add to the storage requirements.
Download the release artifacts
To download the release artifacts necessary for the installation, you need access to Cinchy.net. This can be obtained during initial onboarding, or users can request access by sending an email to support@cinchy.com.
- Navigate to the Cinchy Releases table.
- Download the following item from the "Release Artifacts" column:
- Cinchy Vx.x.zip
Note: If you are planning to install any of the following, you can save time and download them now as well.
- Cinchy Connections vx.x.zip
- Cinchy Event Listener vx.x.zip
- Cinchy Meta-Forms vx.x.zip
- Cinchy Maintenance CLI vx.x.zip
Core platform installation
To deploy the core platform, you must:
- Create a database in SQL Server
- Create an IIS application pool
- Create the application directories
- Update the CinchySSO appsettings
- Update the Cinchy appsettings
- Create the IIS applications
- Validate
Create a database
For more information about creating a database in SQL server, see the Microsoft Create a database page.
- On your SQL Server 2017+ instance, create a new database and name it Cinchy.
If you choose an alternate name for your database, ensure that you use that name in the rest of the instructions instead of Cinchy.
- Create a single user account with
db_owner privilegesfor Cinchy to connect to the database. If you choose to use Windows Authentication instead of SQL Server Authentication, the authorized account must be the same account that runs the IIS Application Pool.
Create an IIS application pool
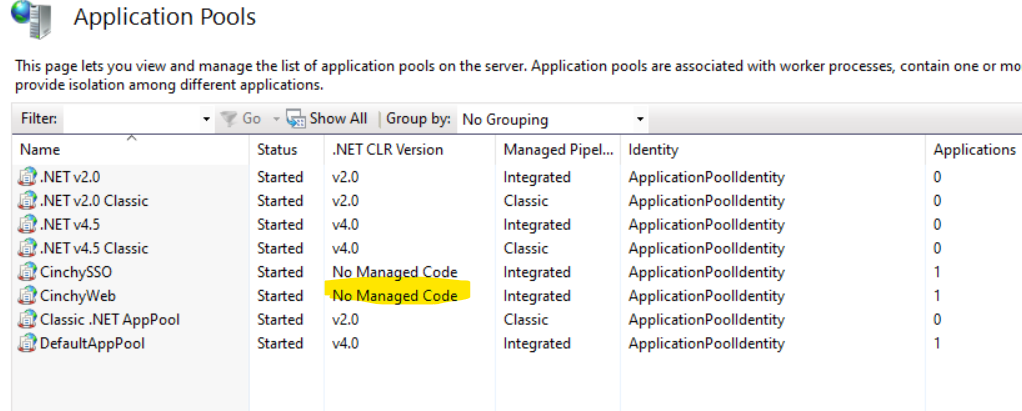
This section will create two application pools, "CinchySSO" and "CinchyWeb".
- On the Windows Server machine, launch an instance of PowerShell as an Administrator.
- Copy and run the PowerShell snippet below to create the application pool and set its priorities. You can also manually create the app pool via the IIS Manager.
Import-Module WebAdministration
$applicationPoolNameSSO="CinchySSO"
$applicationPoolNameWeb="CinchyWeb"
New-WebAppPool -Name $applicationPoolNameSSO
$appPath = "IIS:\AppPools\"+ $applicationPoolNameSSO
$appPool = Get-IISAppPool $applicationPoolNameSSO
$appPool.managedRuntimeVersion = ""
Set-ItemProperty -Path $appPath -Name managedRuntimeVersion $appPool.managedRuntimeVersion
Set-ItemProperty "IIS:\AppPools\$applicationPoolNameSSO" -Name Recycling.periodicRestart.time -Value 0.00:00:00
Set-ItemProperty "IIS:\AppPools\$applicationPoolNameSSO" -Name ProcessModel.idleTimeout -Value 1.05:00:00
Set-ItemProperty "IIS:\AppPools\$applicationPoolNameSSO" -Name Recycling.periodicRestart.privateMemory -Value 0
New-WebAppPool -Name $applicationPoolNameWeb
Set-ItemProperty "IIS:\AppPools\$applicationPoolNameWeb" -Name Recycling.periodicRestart.time -Value 0.00:00:00
Set-ItemProperty "IIS:\AppPools\$applicationPoolNameWeb" -Name ProcessModel.idleTimeout -Value 1.05:00:00
Set-ItemProperty "IIS:\AppPools\$applicationPoolNameWeb" -Name Recycling.periodicRestart.privateMemory -Value 0
- Change the
CinchyWebapplication pool to run as "No Managed Code".
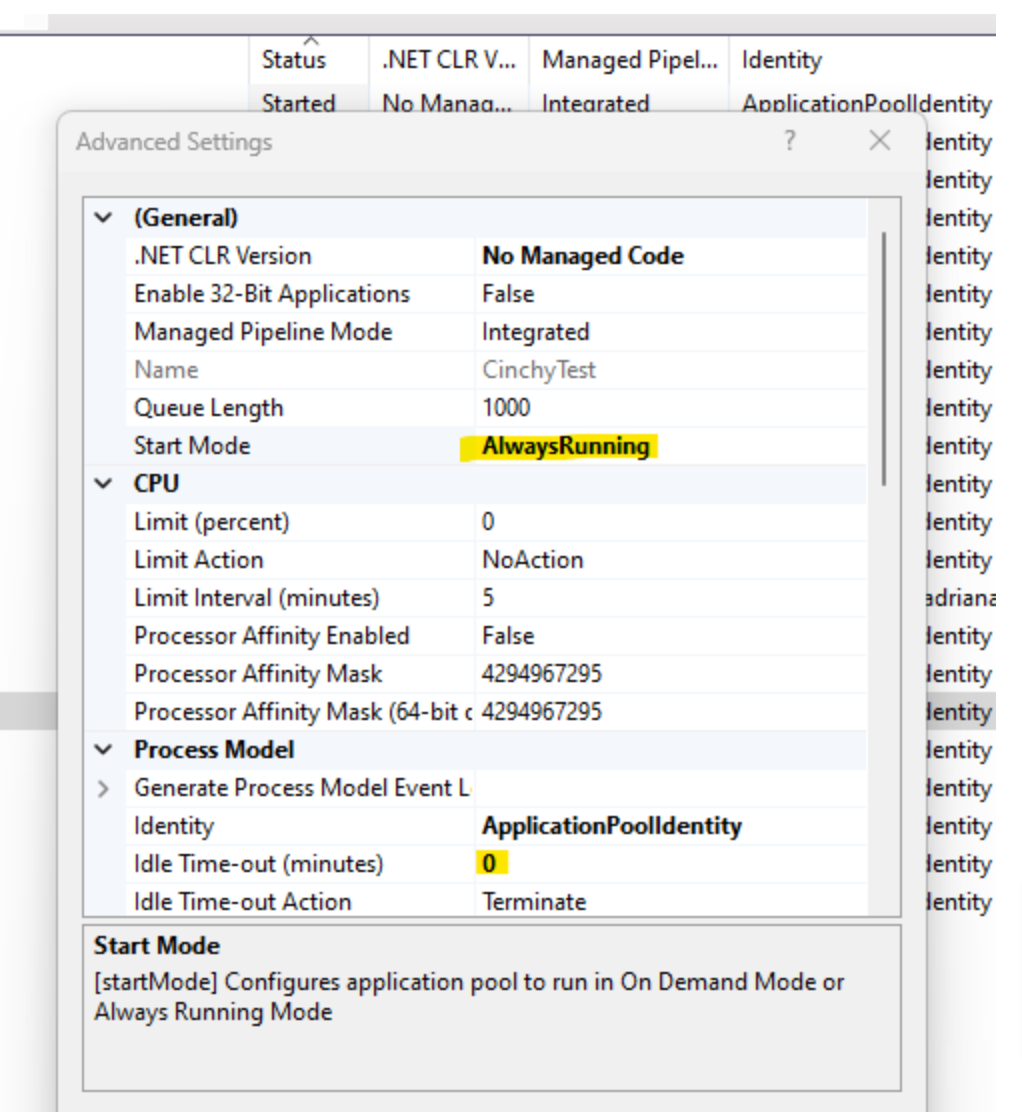
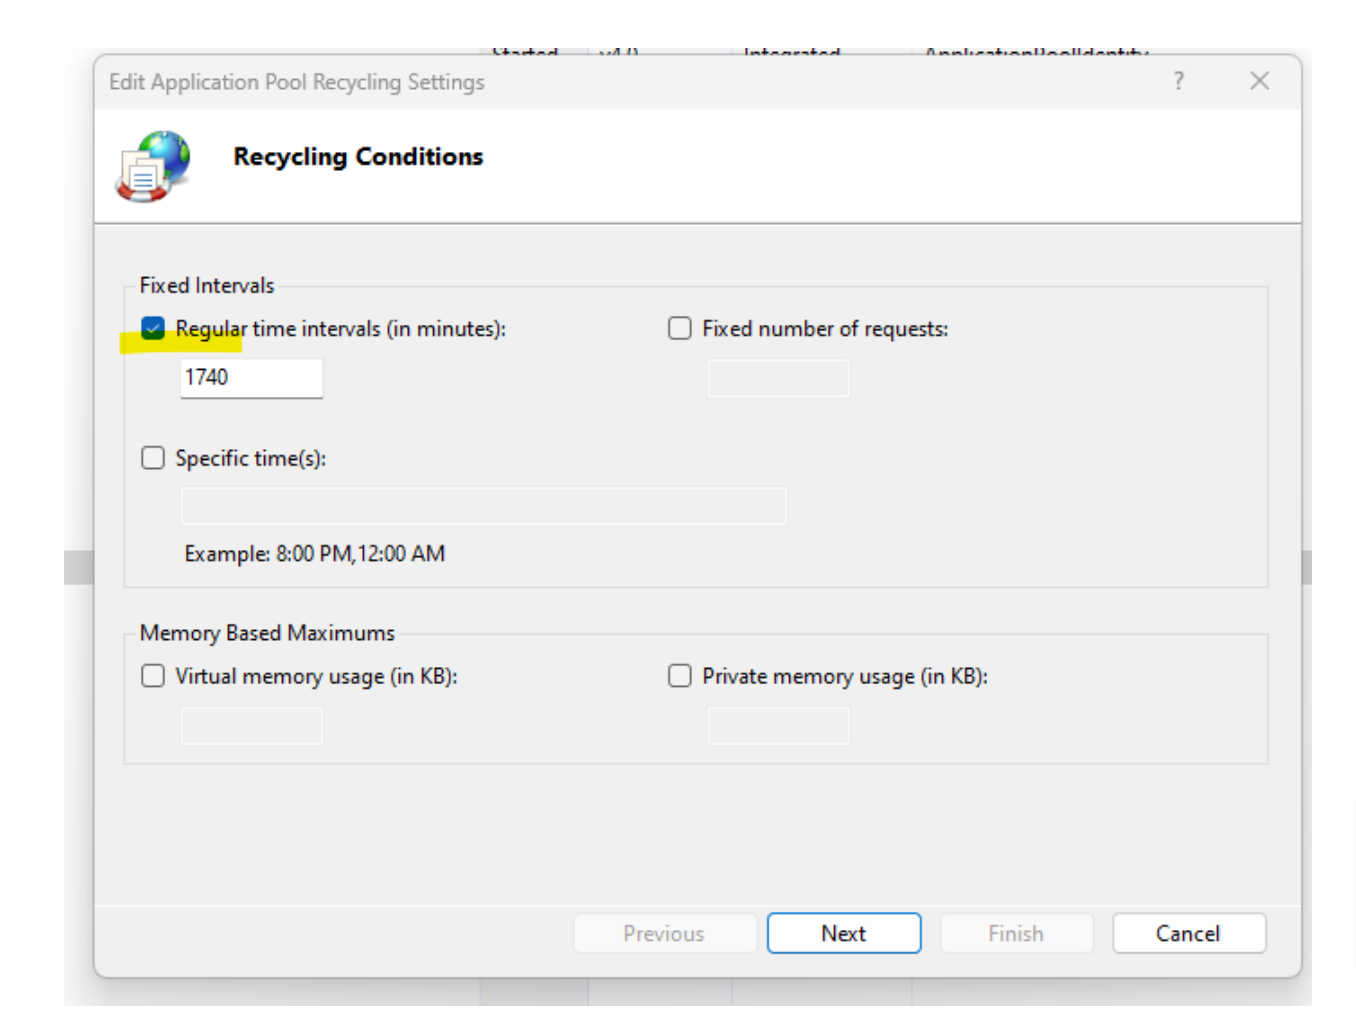
- When scheduled jobs start, there is a chance that they may fail if the application has shut down and takes too long to re-start. To circumvent platform shut down during off-peak times, we recommend the following settings for the app pools:
- Navigate to the Advanced Settings of each application pool and set the following:
- Start Mode: Always Running
- Idle Time-out (minutes): 0

- Navigate to the Recycling settings of each application pool and uncheck the Regular time intervals.
- Navigate to the Advanced Settings of each application pool and set the following:

- If you use Windows Authentication in the database or want to run the application under a different user account, execute the commands below to change the application pool identity.
You can use an alternate name in the application pool if desired.
$credentials = (Get-Credential -Message "Please enter the Login credentials including your Domain Name").GetNetworkCredential()
$userName = $credentials.Domain + '\' + $credentials.UserName
Set-ItemProperty "IIS:\AppPools\$applicationPoolNameWeb" -name processModel.identityType -Value SpecificUser
Set-ItemProperty "IIS:\AppPools\$applicationPoolNameWeb" -name processModel.userName -Value $username
Set-ItemProperty "IIS:\AppPools\$applicationPoolNameWeb" -name processModel.password -Value $credentials.Password
Set-ItemProperty "IIS:\AppPools\$applicationPoolNameSSO" -name processModel.identityType -Value SpecificUser
Set-ItemProperty "IIS:\AppPools\$applicationPoolNameSSO" -name processModel.userName -Value $username
Create the application directories
- Unzip the "Cinchy vX.X" zip file that you previously downloaded to create the
CinchyandCinchySSOdirectories. This deployment guide assumes that the path to these files isC:\CinchyandC:\CinchySSO. If you are creating the directories elsewhere, ensure that you are updating the references in this guide accordingly, including in any powershell scripts that you run. Note: Your application pool accounts should have read and execute access to these directories. - In the Administrator instance of PowerShell, run the below commands to create separate directories for Errorlogs and Logs.
md C:\CinchyLogs\Cinchy
md C:\CinchyLogs\CinchySSO
md C:\CinchyErrors
You can also create it under a single folder. For example,
md C:\your_folder_name\CinchyLogs\Cinchy. If you do, make sure to replace any
related directory instructions with the your folder path.
Update the CinchySSO appsettings.json
This section pertains to Cinchy Single Sign-On (SSO) integration, which must be configured separately after installing the Core Platform if you want to enable single-sign on. For more information on the SSO installation, please see the SSO installation page
- Open the
C:\CinchySSO\appsettings.jsonfile in a text editor. - Under AppSettings section, update the values outlined in the table.
Replace <base url> with your chosen protocol and domain. For example, if using
HTTPS on app.cinchy.co, substitute <base url> with https://app.cinchy.co.
For localhost, use http://localhost/Cinchy.
For all file changes in this deployment, ensure that you escape any slashes when inputting directory paths. For example, C:\CinchySSO should become C:\CinchySSO.
| Parameter | Description | Example |
|---|---|---|
CinchyUri | The base URL appended with /Cinchy. | http://localhost/Cinchy |
CertificatePath | Path to the CinchySSO v5 folder for the certificate. | C:\\CinchySSO\\cinchyidentitysrv.pfx |
StsPublicOriginUri | Base URL of the .well-known discovery. | http://localhost/CinchySSO |
StsPrivateOriginUri | Private Base URL of the .well-known discovery. | http://localhost/CinchySSO |
CinchyAccessTokenLifetime | Duration for the Cinchy Access Token in v5.4+. Defaults to 7.00:00:00 (7 days). | 7.00:00:00 |
DB Type | Database type. Either PostgreSQL or TSQL. | For SQL SERVER installation:TSQL |
-
To connect the application to the database, you must set the
SqlServervalue in the "ConnectionStrings" section:"SqlServer" : ""
Example:
SQL Server authentication example
"SqlServer" : "Server=MyServer;Database=Cinchy;User ID=cinchy;Password=password;Trusted_Connection=False;Connection Timeout=30;Min Pool Size=10;TrustServerCertificate=True;"
SQL Server Windows authentication example
"SqlServer" : "Server=MyServer;Database=Cinchy;Trusted_Connection=True;Connection Timeout=30;Min Pool Size=10;"
- Cinchy has a
serilogproperty that configures where the logs are located.
- Replace the
"WriteTo"section with the below code, noting that:"Name"must be set to "File" so it writes to a physical file on the disk.- Set
"path"to the file path to where you want it to log.
"WriteTo": [
      {
        "Name": "File",
        "Args": {
// For the "path" variable, please refer to the original path in your system where these log folders were created.
          "path": "C:\\CinchyLogs\\CinchySSO\\log.json",
          "preserveLogFilename": true,
          "shared": "true",
          "rollingInterval": "Day",
          "rollOnFileSizeLimit": true,
          "fileSizeLimitBytes": 100000000,
          "retainedFileCountLimit": 30,
          "formatter": "Serilog.Formatting.Compact.CompactJsonFormatter, Serilog.Formatting.Compact"
        }
      }
    ]
Update the Cinchy appsettings.json
- Open the
C:\Cinchy\appsettings.jsonfile in a text editor. - Under AppSettings section, update the values outlined in the table.
| Key | Description | Example |
|---|---|---|
StsPrivateAuthorityUri | Match your private Cinchy SSO URL. i.e | http://localhost/CinchySSO |
StsPublicAuthorityUri | Match your public Cinchy SSO URL. i.e | http://localhost/CinchySSO |
CinchyPrivateUri | Match your private Cinchy URL. i.e | http://localhost/Cinchy |
CinchyPublicUri | Match your public Cinchy URL. | http://localhost/Cinchy |
UseHttps | Use HTTPS. | false |
DB Type | Database type. | TSQL |
MaxRequestBodySize | Introduced in Cinchy v5.4. Sets file upload size for the Files API. Defaults to 1G. | 1073741824 // 1g |
LogDirectoryPath | Match your Web/IDP logs folder path. | C:\\CinchyLogs\\CinchyWeb |
SSOLogPath | Match your SSO log folder path. | C:\\CinchyLogs\\CinchySSO\\log.json |
- Cinchy has a
serilogproperty that configures where the logs are located.
- Replace the
"WriteTo"section with the below code, noting that:"Name"must be set to "File" so it writes to a physical file on the disk.- Set
"path"to the file path to where you want it to log.
"WriteTo": [
      {
        "Name": "File",
        "Args": {
// For the "path" variable, please refer to the original path in your system where these log folders were created.
          "path": "C:\\CinchyLogs\\Cinchy\\log.json",
          "preserveLogFilename": true,
          "shared": "true",
          "rollingInterval": "Day",
          "rollOnFileSizeLimit": true,
          "fileSizeLimitBytes": 100000000,
          "retainedFileCountLimit": 30,
          "formatter": "Serilog.Formatting.Compact.CompactJsonFormatter, Serilog.Formatting.Compact"
        }
      }
    ]
- An encryption key value should be added to this section. The best, most secure practice is to have different encryption key values between all of your instances. However, if you want your same encrypted values to work consistently between instances across multiple servers, then the same key can be used. In a new row, add the following line and a well-chosen key value:
"CINCHY_ENCRYPTION_KEY": ""
Example:
{
  "CINCHY_ENCRYPTION_KEY": "86350218365472387FGJSNSIEVI34722"
  "ConfigSettings": {
    "AppSettings": {
      "StsPrivateAuthorityUri": "http://localhost/CinchySSO",
      "StsPublicAuthorityUri": "http://localhost/CinchySSO",
      "CinchyPrivateUri": "http://localhost/Cinchy",
      "CinchyPublicUri": "http://localhost/Cinchy",
      "AllowLogFileDownload": false,
      "LogDirectoryPath": "C:\\CinchyLogs\\CinchyWeb",
      "SSOLogPath": "C:\\CinchyLogs\\CinchySSO\\log.json",
      "UseHttps": false,
      "HstsMaxAge": 2592000,
      "HstsIncludeSubDomains": false,
      "HstsPreload": false,
      "TlsVersion": "",
      "RouteDebuggerEnabled": false,
      "RefreshCacheTimeInMin": 10,
      "DefaultExpirationCacheTimeInMin": 360,
      "DBType": "TSQL",
      "StorageType": "Local", // Local | S3 | AzureBlobStorage
      "MaxRequestBodySize": 1073741824 // 1gb
    },
  }
}
- To connect the application to the database, you must set the
SqlServervalue in the "ConnectionStrings" section:
"SqlServer" : ""
Example:
SQL Server authentication example
"SqlServer" : "Server=MyServer;Database=Cinchy;User ID=cinchy;Password=password;Trusted_Connection=False;Connection Timeout=30;Min Pool Size=10;TrustServerCertificate=True;"
SQL Server Windows authentication example
"SqlServer" : "Server=MyServer;Database=Cinchy;Trusted_Connection=True;Connection Timeout=30;Min Pool Size=10;"
Create the IIS applications
- Open an Administrator instance of PowerShell.
- Execute the below commands to create the IIS applications and enable anonymous authentication. (This is required to allow authentication to be handled by the application). Remember to update the physical path if you placed your directories elsewhere.
New-WebApplication -Name Cinchy -Site 'Default Web Site' -PhysicalPath C:\Cinchy -ApplicationPool CinchyWeb
New-WebApplication -Name CinchySSO -Site 'Default Web Site' -PhysicalPath C:\CinchySSO -ApplicationPool CinchySSO
Set-WebConfigurationProperty -Filter "/system.webServer/security/authentication/anonymousAuthentication" -Name Enabled -Value True -PSPath IIS:\ -Location "Default Web Site"
To enable HTTPS, you must load the server certificate and the standard IIS configuration completed at the Web Site level to add the binding.
Validate
- Access your
<base url>/Cinchy(example: http://app.cinchy.co/Cinchy) site through a web browser. - Once the login screen appears, enter the credentials:
- The default username is admin and the password is cinchy.
- You will be prompted to change your password the first time you log in.
Next steps
Navigate to the following sub-pages to deploy the following bundled v5 components: