v5.20 (IIS)
The following process can be run when upgrading any v5.x instance to v5.20.x on IIS.
The upgrade of any version to Cinchy v5.20.x may require changes to be made to various AppSetting files.
Prerequisites
If you have made custom changes to your deployment file structure, please contact your Support team before you upgrade your environments.
- Download the latest Cinchy Artifacts from the Cinchy Releases Table > Release Artifacts column. Check this into your file repository and make note of the path so that you can easily find it again later. (For example:
/Users/user/Desktop/Upgrades/Cinchy v5.20.x) - Download the following if not already installed. Note that Cinchy v5.18+ has been updated from .NET 8 to .NET 10.
Considerations
Depending on your current version, you may need to:
- Run the 5.2 upgrade script
- Run the 5.5 upgrade script
Considerations Table
| Current Version | Run the 5.2 Upgrade Script | Run the 5.5 Upgrade Script |
|---|---|---|
| 5.0 | Yes | Yes |
| 5.1 | Yes | Yes |
| 5.2 | X | Yes |
| 5.3 | X | Yes |
| 5.4 | X | Yes |
| 5.5 | X | X |
| 5.6 | X | X |
| 5.7 | X | X |
| 5.8 | X | X |
| 5.9 | X | X |
| 5.10 | X | X |
| 5.11 | X | X |
| 5.12 | X | X |
| 5.13 | X | X |
| 5.14 | X | X |
| 5.15 | X | X |
| 5.16 | X | X |
| 5.17 | X | X |
| 5.18 | X | X |
| 5.19 | X | X |
Upgrade process
- Take a backup of your database.
- For an example on how to do so using SQL Server Management Studio, click here.
- Navigate to the new
Cinchy v5.20.xfolder that was downloaded in the Prerequisites section of this guide. - From within the
Cinchy v5.20.xfolder, navigate to the/Cinchy v5.20.x/Cinchy/appsettings.jsonfile.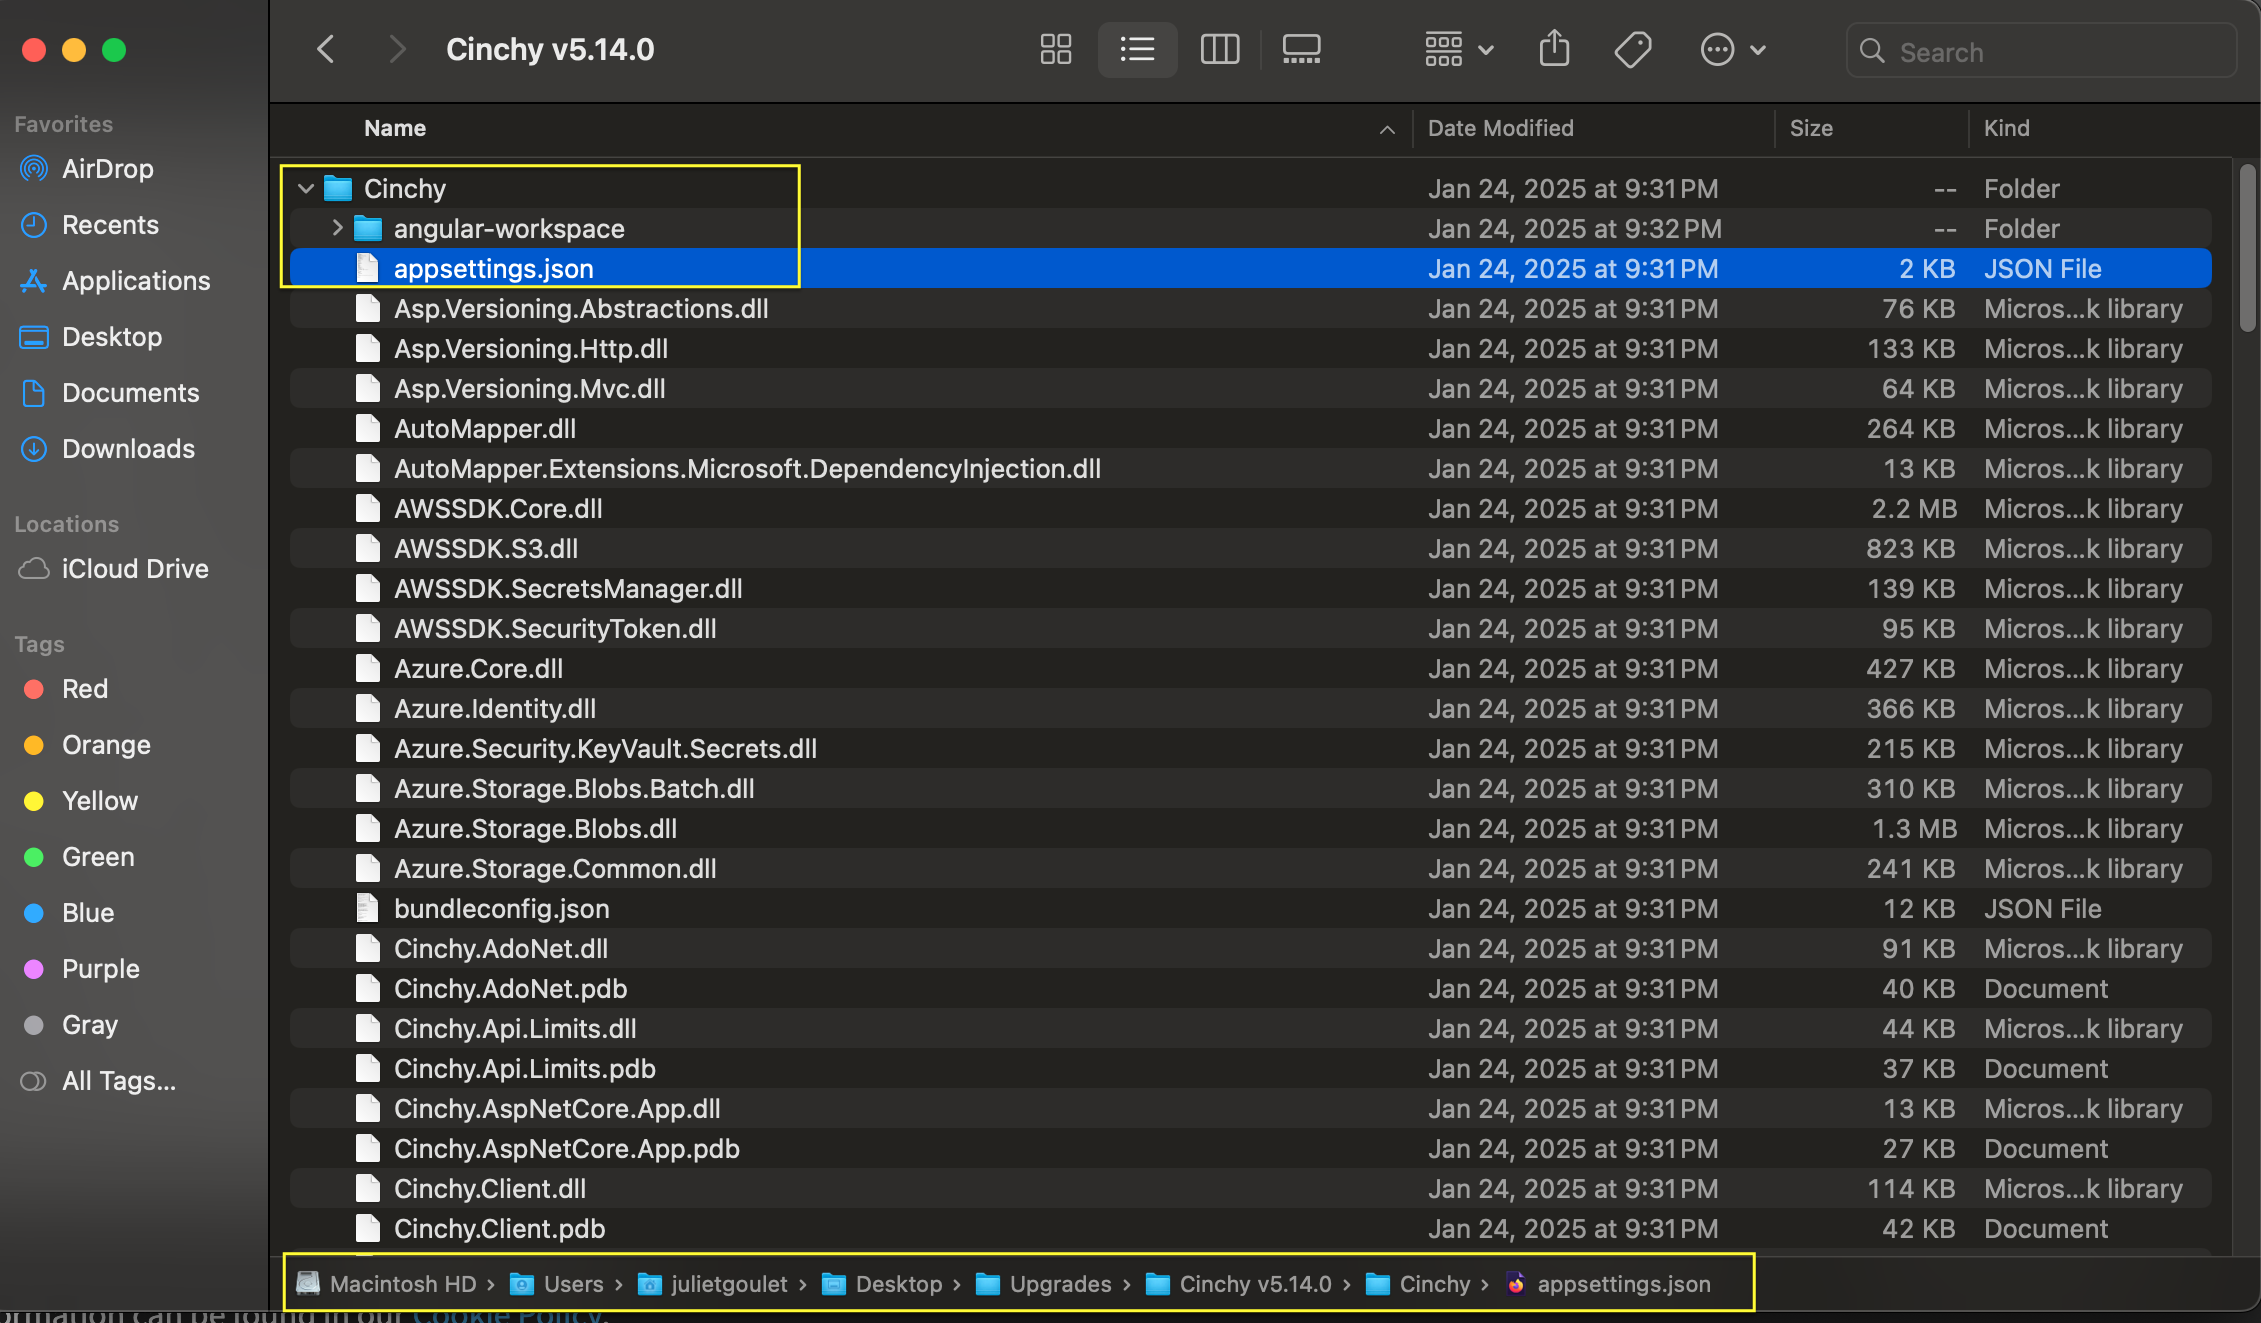
- Open the file in the text compare or merge utility tool of your choosing. (For example: VS Code.)
- Open the matching file from your current configuration files, for example
/Cinchy v5.19/Cinchy/appsettings.json, in the same text compare or merge utility tool. - Compare your old configuration to the new one, merging your settings into
/Cinchy v5.20.x/Cinchy/appsettings.json. For instructions on doing this with VS Code, click here.
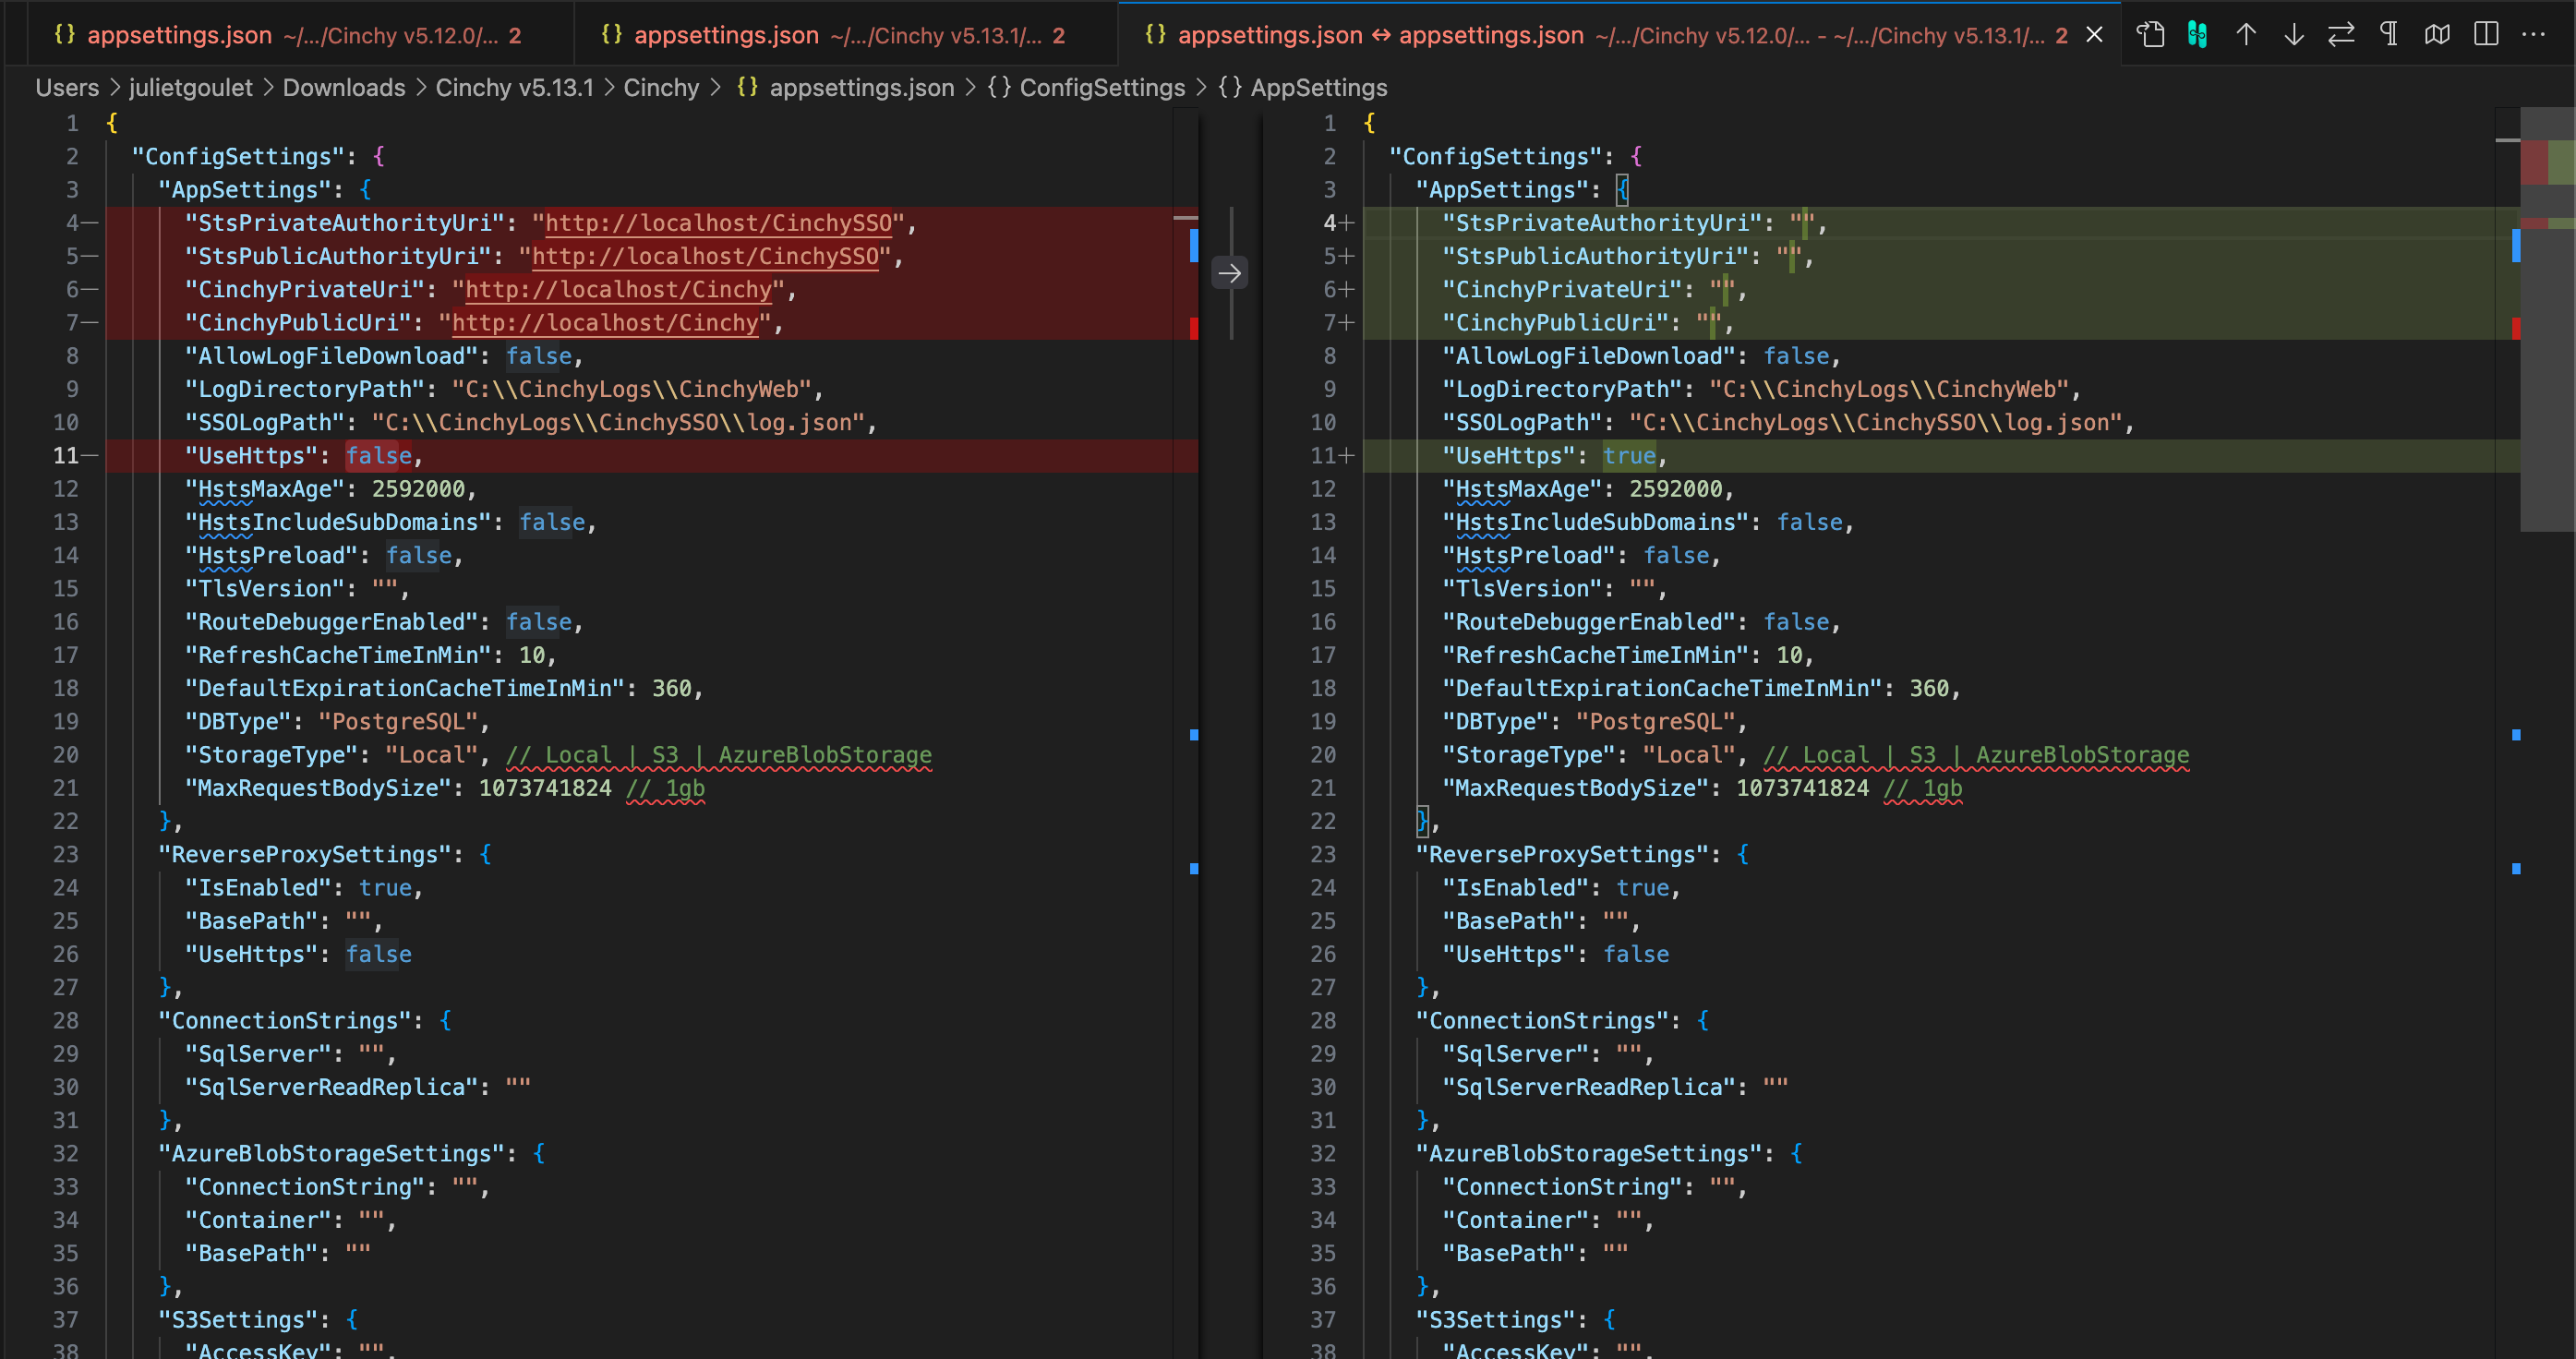
For example, in the below screenshot we have opened two files in VS Code to compare: /Cinchy v5.19/Cinchy/appsettings.json and /Cinchy v5.20.x/Cinchy/appsettings.json.
The utility tool identifies any differences between the two files and highlights them in red; in this case our config information. Using the right arrow that appears between the two configs, we can tell VS Code to merge the differences from the 5.19 file into the 5.20.x file. This prevents the manual re-entry of data.
Make sure to take note of any new section(s) that might appear in the 5.20.x config as well, inputting values as necessary.
After repeating this for all of the differences, save the /Cinchy v5.20.x/Cinchy/appsettings.json file.
-
Repeat this process for the following configuration files, comparing and merging your settings into the new files:
/Cinchy v5.20.x/Cinchy/web.config/Cinchy v5.20.x/CinchySSO/appsettings.json/Cinchy v5.20.x/CinchySSO/web.config/Cinchy Connections v5.20.x/CinchyConnectionsWebApi/ClientApp/dist/index.html. This step ensures that the Connections Experience will load. Pay particular attention that the base path matches./Cinchy v5.20.x/Mcp/appsettings.json(applies only if you have the Cinchy MCP Server deployed — introduced in v5.19. See MCP Deployment if you are deploying it for the first time.)
-
If you are upgrading to v5.20.x and didn't do so in any previous updates, you are required to make some changes to various appsettings.json files. These changes are outlined in the following sections:
-
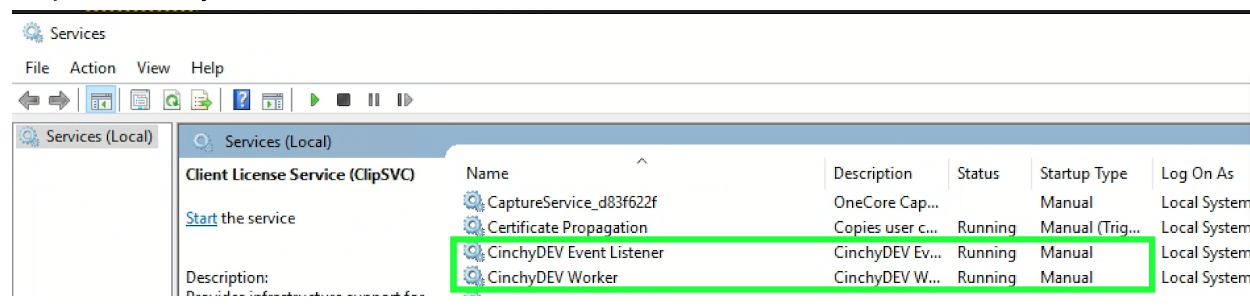
Navigate to your Connections Server. Stop the following services by clicking on them and then the square stop icon in the task bar:
- Cinchy Listener service.
- Cinchy Worker service.
-
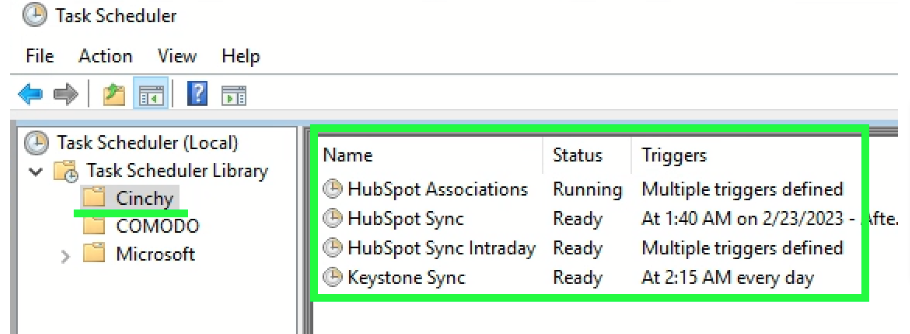
If there are any sync jobs scheduled in the Windows Task Scheduler:
- Make a note of which jobs are scheduled, as a backup.
- Disable the jobs.
-
As an administrator, open a command line/terminal and execute the following command:
iisreset -stop
- Navigate to your Database Server.
- Stop the SQL Server Cinchy Database by right-clicking it and selecting
Stop.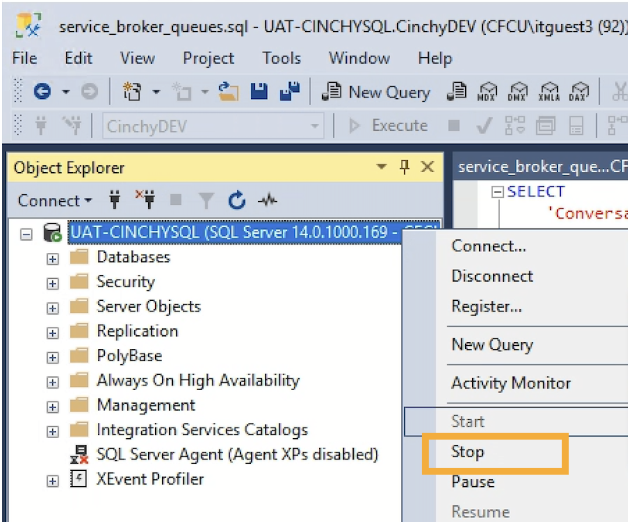
- Replace your current/old Cinchy and CinchySSO folders with the new 5.20.x folders, i.e.
/Cinchy v5.20.x/Cinchyand/Cinchy v5.20.x/CinchySSO.- If upgrading from a version prior to v5.19, also deploy the new Mcp folder as a web application under your Cinchy IIS site. See MCP Deployment for full instructions.
- Start the SQL Server Cinchy Database by right-clicking it and selecting
Start. - As an administrator, open a command line/terminal and execute the following command:
iisreset -start
- Re-enable any jobs in the Task Scheduler.
- Double check and re-enable any CDCs that may have turned off during the upgrade.
- Navigate to your Connections Server. Start the following services by clicking on them and then the triangle start icon in the task bar:
- Cinchy Listener service.
- Cinchy Worker service.
- Open your Cinchy URL in your browser.
- All users must log out and back in to your Cinchy environment in order for the changes to properly take effect.
Email Notification Service Deployment
The Cinchy Email Notification Service is a new component introduced in v5.20. Deploying it is optional. If you do not plan to use email notifications, you can skip this entire section.
If you are upgrading from a prior version and want to deploy the service, follow all steps below. If you are performing a fresh v5.20 install, the same steps apply.
On IIS, the Notification Service is deployed as an IIS web application (sub-application) nested under the main Cinchy site — the same pattern used for /connections, /idp, and /mcp. It inherits the Cinchy site bindings (hostname, port, SSL certificate) and is reachable at https://<host>/notification.
The resulting topology is:
| URL path | IIS app pool | Physical path | Service |
|---|---|---|---|
/ | Cinchy | C:\inetpub\wwwroot\Cinchy | Cinchy.Web |
/idp | CinchySSO | C:\inetpub\wwwroot\CinchySSO | Cinchy.IdP |
/connections | Connections | C:\inetpub\wwwroot\Connections | Cinchy.Connections.WebApi |
/mcp | MCP | C:\inetpub\wwwroot\MCP | Cinchy.Mcp |
/notification | Notification | C:\inetpub\wwwroot\Notification | Cinchy.NotificationService |
Prerequisites
- The ASP.NET Core 10.0 Runtime (Windows Hosting Bundle) must be installed (already covered in the main Prerequisites above). The
ApplicationInitializationModuleIIS feature is also required for thepreloadEnabledsetting used below. - The model upgrade automatically provisions the supporting objects on first startup (via the v5.20 model upgrade): the
notification@cinchy.comuser, thecinchy_notificationintegrated client, theNotifications EnabledSystem Property (global kill switch), and theNotification Outbox,Notification Config, andNotification Brandingtables. No manual table creation is needed. - You will need the password for the
notification@cinchy.comuser on your Cinchy IdP. Look it up (or set it) in user management before configuring the service. - The commands below use
appcmd.exe(%windir%\system32\inetsrv\appcmd.exe), which is always present with IIS. Run them from an Administrator PowerShell session.
Step 1 - Deploy the Notification artifacts
-
From the downloaded
Cinchy v5.20.xrelease artifacts, locate theNotificationfolder. -
Copy it to your Cinchy IIS site root:
$installPath = "C:\inetpub\wwwroot\Notification"
New-Item -ItemType Directory -Path $installPath -Force | Out-Null
# Copy the contents of the release "Notification" folder into $installPath -
Confirm the key files are present:
Test-Path "$installPath\Cinchy.NotificationService.exe"   # True
Test-Path "$installPath\appsettings.json"                 # True
Test-Path "$installPath\web.config" # Trueweb.configpoints IIS atAspNetCoreModuleV2; all three files must exist before continuing.
Step 2 - Configure appsettings.json
Open C:\inetpub\wwwroot\Notification\appsettings.json and set the deployment-specific values. The shipped file is dev-defaulted and must be overridden for any real environment.
Start with the common settings below. The Provider block is then filled in based on the provider you choose in the next step.
{
  "CinchyEnvironment": "<your-environment-label>",

  "CinchyClientSettings": {
    "Url": "https://<your-cinchy-host>",
    "Password": "<password for notification@cinchy.com>"
  },

  "EmailNotification": {
    "DefaultFromAddress": "noreply@<your-domain>",
    "DefaultFromDisplayName": "Cinchy Notifications",

    "Provider": {
      // Choose and configure ONE provider — see "Choose your email provider" below
    }
  },

  "BuildIdentifier": "release/v5.20"
}
| Setting | Description |
|---|---|
CinchyEnvironment | Appears on every email's environment badge so recipients know which instance fired it. Set it at the top level (not nested under CinchyClientSettings). |
CinchyClientSettings.Url | The public HTTPS URL of your Cinchy Web instance — the same URL you open in a browser. Used to discover the IdP URL. |
CinchyClientSettings.Password | The password for the notification@cinchy.com user on your Cinchy IdP. |
EmailNotification.DefaultFromAddress | The sender address shown in the From header. Must be authorized by your chosen provider. |
Choose your email provider
Replace the Provider block above with one of the following. Most on-prem/IIS deployments use SMTP.
- SMTP
- AWS SES
- Azure Communication Services
- Microsoft Graph
"Provider": {
  "Type": "Smtp",
  "Smtp": {
    "Host": "smtp.office365.com",
    "Port": 587,
    "Security": "StartTls",
    "RequireAuth": true,
    "Username": "noreply@<your-domain>",
    "Password": "<smtp-password>"
  }
}
Security accepts None, Auto, SslOnConnect, StartTls, or StartTlsWhenAvailable. For an internal relay with no auth or TLS, use "Security": "None" and "RequireAuth": false. For self-signed certificates, add "ValidateCertificates": false.
AWS SES supports two authentication methods. Leave the keys empty to use a role; populate them to use static credentials.
Method 1 — IAM role (EC2 instance role / default AWS credential chain):
"Provider": {
  "Type": "AwsSes",
  "AwsSes": {
    "Region": "us-east-1",
    "ConfigurationSetName": "cinchy-notifications",
    "FeedbackForwardingAddress": "bounce@<your-domain>"
  }
}
Method 2 — Access key and secret:
"Provider": {
  "Type": "AwsSes",
  "AwsSes": {
    "Region": "us-east-1",
    "AccessKeyId": "<aws-access-key-id>",
    "SecretAccessKey": "<aws-secret-access-key>"
  }
}
Connection string:
"Provider": {
  "Type": "AzureCommunication",
  "AzureCommunication": {
    "ConnectionString": "endpoint=https://<your-acs>.communication.azure.com/;accesskey=..."
  }
}
Managed identity:
"Provider": {
  "Type": "AzureCommunication",
  "AzureCommunication": {
    "Endpoint": "https://<your-acs>.communication.azure.com",
    "UseManagedIdentity": true
  }
}
For Microsoft 365 environments where SMTP submission is disabled. Requires a Microsoft Entra (Azure AD) app registration granted the Mail.Send application permission.
"Provider": {
  "Type": "MicrosoftGraph",
  "MicrosoftGraph": {
    "TenantId": "<entra-tenant-id>",
    "ClientId": "<app-registration-client-id>",
    "ClientSecret": "<client-secret>",
    "SenderUserPrincipalName": "noreply@<your-domain>"
  }
}
Use CertificateThumbprint instead of ClientSecret for certificate authentication (recommended for production).
For the full list of provider options and how auto-detection picks a provider, see How the provider is selected in the Email Notification Service guide.
Storing the IdP password and provider credentials in appsettings.json keeps them in cleartext on disk. For production, prefer machine environment variables (which take precedence over JSON), for example EmailNotification__Provider__Smtp__Password. If you keep secrets in the file, lock down its ACL:
icacls "C:\inetpub\wwwroot\Notification\appsettings.json" /inheritance:r /grant "BUILTIN\Administrators:F" "NT AUTHORITY\SYSTEM:F" "IIS AppPool\Notification:R"
Step 3 - Create the IIS application pool
$ac = "$env:windir\system32\inetsrv\appcmd.exe"

# Create the pool
& $ac add apppool /name:"Notification" /managedRuntimeVersion:"" /autoStart:true

# No Managed Code, AlwaysRunning, no idle shutdown, no scheduled recycle
& $ac set apppool "Notification" /startMode:"AlwaysRunning"
& $ac set apppool "Notification" /processModel.idleTimeout:"00:00:00"
& $ac set apppool "Notification" /recycling.periodicRestart.time:"00:00:00"
These settings are required, not optional. The Notification Service runs four background services (the outbox processor and three monitors) on internal timers. If IIS shuts the pool down on idle timeout or recycles it on a schedule, those timers stop and emails stop sending. AlwaysRunning + idleTimeout = 0 + no periodic recycle keeps the worker running 24/7.
managedRuntimeVersion:"" is No Managed Code, which is required because the app is ASP.NET Core (hosted in-process by AspNetCoreModuleV2), not .NET Framework.
Step 4 - Register the sub-application
$ac = "$env:windir\system32\inetsrv\appcmd.exe"

& $ac add app /site.name:"Cinchy" /path:"/notification" /physicalPath:"C:\inetpub\wwwroot\Notification" /applicationPool:"Notification"
& $ac set app "Cinchy/notification" /preloadEnabled:true
& $ac list app "Cinchy/notification"
Expect APP "Cinchy/notification" (applicationPool:Notification). preloadEnabled:true, combined with the AlwaysRunning pool, warms the app at site startup so the background services start within seconds of an iisreset.
Cinchy is the parent IIS site name. If your install uses a different site name (for example, Default Web Site), substitute it in the commands above.
Step 5 - Set folder permissions
The IIS AppPool\Notification virtual identity needs read/execute on the install folder and write on the log folder.
icacls "C:\inetpub\wwwroot\Notification" /grant "IIS AppPool\Notification:(OI)(CI)RX" /T

# C:\CinchyLogs is the default Serilog target — adjust if your appsettings.json logs elsewhere.
New-Item -ItemType Directory -Path "C:\CinchyLogs" -Force | Out-Null
icacls "C:\CinchyLogs" /grant "IIS AppPool\Notification:(OI)(CI)M" /T
Step 6 - Start and verify
& "$env:windir\system32\inetsrv\appcmd.exe" start apppool "Notification"
Tail the log as the app boots:
Get-Content "C:\CinchyLogs\notifylog.txt" -Wait -Tail 50
Within about 10 seconds you should see the provider initialize, templates load, and the four background services start (outbox processor, automation monitor, long-running batch monitor, long-running automation monitor).
Then probe the health endpoints:
| URL | Expected |
|---|---|
https://<host>/notification/healthcheck | 200 with JSON including "component": "Cinchy.NotificationService" and Green checks for Cinchy connectivity, outbox table access, and the email provider |
https://<host>/notification/health | 200 {"status":"Green"} (liveness) |
https://<host>/notification/health/ready | 200 (readiness — confirms it can read the outbox table) |
Invoke-WebRequest https://<host>/notification/healthcheck -UseBasicParsing | Select-Object StatusCode, Content
Under IIS in-process hosting the app does not bind a standalone TCP port — IIS handles all HTTP I/O through AspNetCoreModuleV2. Reaching the service only via https://<host>/notification/... (not localhost:8000) is expected and correct.
Step 7 - Point the other services at the Notification Service
Cinchy services that fire sync and listener events (Connections, Worker, Event Listener) deliver them to the Notification Service by HTTP POST. For each consumer, add a NotificationService block in its appsettings.json alongside the existing CinchyClientSettings block, pointing BaseUrl at the new sub-application:
{
    "NotificationService": {
        "BaseUrl": "https://<your-cinchy-host>/notification"
    },
    "CinchyClientSettings": {
        "Url": "https://<your-cinchy-host>",
        "Username": "<username>",
        "Password": "<password>"
    }
}
The CinchyClientSettings block already exists in each consumer's appsettings.json — it is shown here only as a landmark for where to add NotificationService. Replace <your-cinchy-host> with your own Cinchy hostname.
The /notification path component is required. Omitting it causes the webhook POST to miss the sub-application and return 400 Bad Request.
After editing each consumer's appsettings.json, recycle that pool, for example:
& "$env:windir\system32\inetsrv\appcmd.exe" recycle apppool "Connections"
Step 8 - Enable notifications
-
In
[Cinchy].[System Properties], set the global kill switch:Name Value Notifications Enabledtrue -
In
[Cinchy].[Notification Config], add a row for each artifact you want to monitor, with recipients andSend Email = true. Recipients must be set per artifact — there is no global default recipient list. You can also configure trigger filtering, CC/BCC, and branding here. See the Email Notification Service guide for full configuration details and use cases. -
End-to-end test: run a sync that fails (or an automation) that has a Notification Config row, then confirm the email arrives and that an entry was written to
[Cinchy].[Notification Outbox]withStatus = Sent.
Troubleshooting
| Symptom | Likely cause and fix |
|---|---|
HTTP Error 500.30 — ASP.NET Core app failed to start | Check the Windows Application event log under source IIS AspNetCore Module V2. Most commonly the .NET 10 Hosting Bundle is missing (dotnet --list-runtimes should show Microsoft.AspNetCore.App 10.0.x) — install it and run iisreset. |
/notification/healthcheck returns Cinchy.Web's JSON ("component":"Cinchy") instead of the Notification Service's | The sub-application isn't registered against the Notification pool, so IIS routes the path to Cinchy.Web. Re-check Step 4 — appcmd list app "Cinchy/notification" must show applicationPool:Notification. |
Consumer service logs 400 Bad Request when firing a notification | The consumer's NotificationService:BaseUrl is missing the /notification path component (Step 7), or the consumer build predates the v5.20 webhook path fix. |
Failed to retrieve the IdP url from Cinchy | The configured CinchyClientSettings.Url can't reach /.well-known/cinchy-configuration. Verify Invoke-WebRequest "https://<host>/API/GetStsAuthorityUri" returns 200. If it works from PowerShell but the service still fails, it is usually an SSL trust issue on a self-signed loopback — point the URL at the site's HTTP binding instead. |
Email body missing the Environment: badge | CinchyEnvironment isn't set at the top level of appsettings.json (or as a machine env var). Set it and recycle the pool. |
Uninstall / rollback
$ac = "$env:windir\system32\inetsrv\appcmd.exe"

& $ac stop apppool "Notification"
& $ac delete app "Cinchy/notification"
& $ac delete apppool "Notification"

# Remove the install folder (logs under C:\CinchyLogs are left in place)
Remove-Item -Recurse -Force "C:\inetpub\wwwroot\Notification"
Event Listener Service Change
The following needs to be done only if you did not do so in a previous upgrade.
When upgrading Cinchy Event Listener from v5.9 (or lower) to v5.10+, note that the service name has changed. To ensure this change is properly reflected in the Windows Service, you need to follow these steps:
- Open a PowerShell 5.1 terminal within the CinchyEventListener deployment directory.
- Run the PowerShell file
remove-cinchy-event-listener-windows-service.ps1. - After removing the service, run the PowerShell file
create-cinchy-event-listener-windows-service.ps1 "path to CinchyEventListener".
If your Cinchy Event Listener is using a trusted connection, remember to update these details for the CinchyENV Event Listener service in the Services.msc control panel.
Support
If you encounter an error during this process, restore your database backup and contact Cinchy Support.